Deuteronomy 16:15

Deuteronomy 16:15
For the LORD your God will bless you in all your harvest and in all the work of your hands, and your joy will be complete.


Showing posts with label preschool. Show all posts

Friday, March 30, 2012

Resurrection Eggs - Day 1

On Tuesday we opened our first Resurrection Egg! If you are not familiar with Resurrection Eggs, here is a quick run down. Basically, they are a dozen plastic eggs, each filled with some type of item that is a reminder of the Easter story. The first egg has a donkey to remind us of Palm Sunday, and Jesus riding into Jerusalem on a donkey. The second egg has some coins, to remind us of Judas taking the 30 coins to betray Jesus, and on it goes! I just ordered them here from Amazon. If you want to make your own Resurrection Eggs, you can go here to get some free printables. They are not expensive, and to me, well worth the cost to have the real items the kids can feel in each egg. In addition to the eggs, comes a little devotional with what scripture to read with each egg, and discussion ideas. We are already on egg/day #4, but I thought I would share what we did on the first day so you could get an idea of the types of things we are doing each day leading up to Easter!


Here Naomi was getting ready to open the first egg. She was VERY excited!


You can't really see it, but in the first egg was a little donkey. We happened to have a book about the donkey Jesus borrowed, so we read that too. We also learned a song about Palm Sunday! I didn't get a video to post here, but I will try to put one up on Facebook.


Here the kids are cutting out the palm branches to make a path for Jesus to Jerusalem. We aren't doing crafts to go with the eggs every day, but this one we couldn't pass up! Naomi did the cutting, and Nathan did a lot of the gluing, with help from sister too! I was pleased how nicely they worked together on this.


They were very proud of their finished work!


A close up of the finished product. I got the idea for this from Christian Preschool Printables. I have a love/hate relationship with this site. I LOVE it because they have tons of great ideas and free printables. I hate it because it's hard to find anything, and I think that the graphics they use are creepy. I would give you the exact link for this craft but (shock!) I can't find it on their site again!


Here the kids are playing a counting game using the dice. They would roll the dice, and then stamp that many palm leaves on the path to Jerusalem. Nathan just stamped wherever he wanted, but they both still liked it! I got this printable, and tons of great discussion ideas from 2 Teaching Mommies. Be sure to check out their ideas for resurrection eggs!


The kids LOVE opening these eggs each day, and this has provided us with lots of great discussion opportunities. The activities we've been doing to go along with have been so much fun too. I love how this has really kept us focused on the true meaning of Easter.

Karla

Saturday, March 24, 2012

Money and Store

As much as I'd like to be one of those bloggers that is totally on top of it, and shares all the wonderful things they do, I've realized that one or two posts a month is what is more realistic for me. Therefore, I want to share one of our highlights from the month of March!

I wanted to introduce Naomi to the concept of using money, and coin recognition. I could think of no better way to do it then to set up our own store! Sitting down and doing a worksheet on money = not so fun. However, setting up a store where you can buy and sell things = SUPER fun! If there is a fun way to learn a concept, I'm all for it!

What do you need for a store? Well, start with....


a daily specials board,


a produce section,


a wide variety of items from your pantry, divided by category and labeled of course,


those little sticky dots so you can put a price on everything, (I did everything in either 1, 5, 10, or 25 cent increments since we were working on coin recognition)


and a cash register with scanner!


Add in a couple of shopping carts, two cute kids, and you are ready to open up your own store, learn about money, and have some fun to boot!


Naomi was super excited and wanted to be the cashier first. In addition to learning about money, it was an excellent opportunity to learn and practice some shopping vocabulary.


Nathan was more than happy to be the first customer!


He went right to the soup section and started shopping.


I had filled their purses with change ahead of time. Nathan would pick an item out of his cart, Naomi would scan it, and look to see how much it cost (by looking at the sticker). Then Nathan would give her a handful of coins, and she had to find the right one. I had introduced Naomi to the coins that morning, and within 5 minutes of playing store, she could recognize and name all the coins. Not bad if you ask me! We didn't work on adding coins together as I didn't want to overwhelm her.


After taking a turn as cashier, Naomi was ready to shop!


She was excited that the fruit was on sale, buy one get one free!

 
Nathan took a turn being the cashier. Naomi had to look at the price on her item, then find and give Nathan the correct coin.


I was the bagger and put all her groceries into an eco-friendly bag!


As I was bagging Naomi's groceries Nathan wandered away. After a minute he came running over shouting, "Tower, TOWER"! He had made a tower out of the soup cans and was EXTREMELY proud of himself!


He couldn't reach to add any more cans to his tower on the shelf, so we moved it to the ground, and added some vegetables!

All in all our store was a huge success! We left it set up for over two weeks and played with it almost daily. Naomi learned to identify her coins, and most importantly, we all had a lot of fun playing together! I got the idea from this post on No Time for Flashcards, which is my new favorite blog! Take a minute to check it out!

Karla
Tuesday, February 21, 2012

Valentine's Day Playdough

This is only the second time I have made homemade playdough with the kids and it was a HUGE success! I'm not one of those people that feel homemade, and from scratch, is always better, but I have to say, in this case it is. Homemade playdough has such a nicer texture than store bought playdough, and the fact that you can make it smell wonderful is a huge bonus. Plus the kids adore making it with me.

To help celebrate Valentine's Day we made chocolate playdough. It smelled sooooooooo good!


Both kids took turns measuring and mixing. Excellent math skills!


It sort of looked like chocolate pudding when we first put it on the stove.


A few minutes of heavy stirring on Mommy's part, and you get a nice big ball of playdough!


They got right to playing before the playdough was even cool.


Nathan really dug these heart shaped measuring cups.


Naomi loved making cookies and mini cakes with this ice cube tray. I gave them some birthday candles later too, and they thought that was fabulous. We sang happy birthday to each other about a million times. ;)


I worked with Nathan on all sorts of vocabulary as we were playing. He liked these cookie cutters so we talked about BIG hearts and little hearts, soft and hard, fat and skinny, etc.


Naomi decided we were going to have our own  bakery, and used the tote I was keeping our supplies in as an oven. I love her imagination!


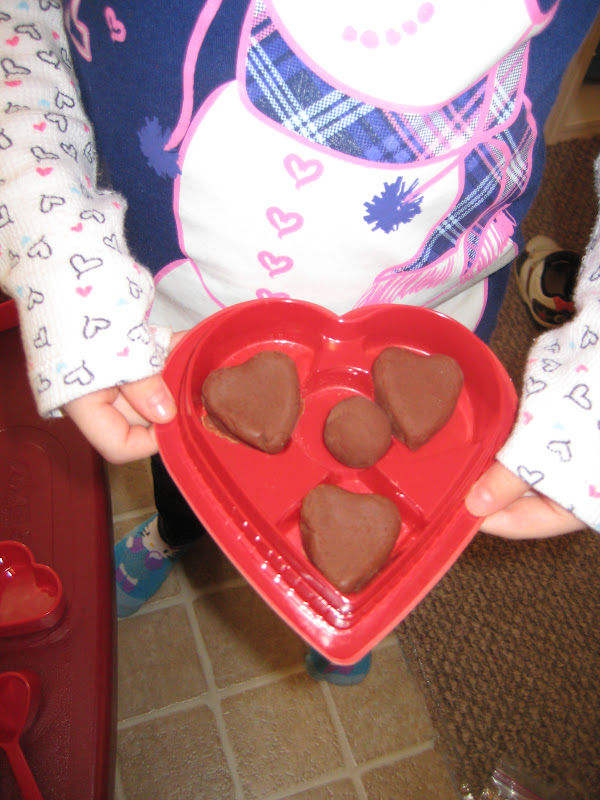
I was kind enough to eat the chocolates out of this chocolate box so the kids could make playdough chocolates. I'm sacrificial that way, being their mother and all. ;)

I'm still rather surprised what a hit this playdough was. The kids have always enjoyed playdough, but they played with this for HOURS upon HOURS for over two weeks! I got the chocolate playdough recipe from here, and here is the base recipe I that I use. Enjoy!

Karla

Wednesday, February 8, 2012

The Mitten

In January one of our theme weeks focused on "The Mitten" by Jan Brett. I don't get the chance to post on here as often as I would like, but I got some cute pictures from that week, and wanted to share what we did. This little blog has become almost like an online scrapbook for me, and I really enjoy going back, and remembering all the different things we do together. To find where we read this book online, and links to all the activities and printables we did, check out my Mitten Board on Pinterest. If you haven't signed up for Pinterest yet, be sure it check it out! I am TOTALLY in love with it, and use it as a great organizational tool to save all the fun ideas I find online to do with the kiddos.

We read "The Mitten" online, and both kids thought that was really neat. Following the Before Five In A Row model, we read the book every day, and sometimes more than once a day. I was actually surprised that the kids wanted to hear it that many times! I was impressed how much they both got out of the book by repeated readings, and how each time we read it, they found something new in the illustrations. The fact that they got to take turns pushing the button on my keyboard to change the page, may have also been a selling point. Oh the simple things in life! ;)


We kicked off our week by making mitten sun catchers to hang in the window. We cut up pieces of tissue paper.


Then we sprinkled the tissue paper into the mitten outline I had cut out. Nathan was able to cut with my help, and got really into sprinkling the paper.


Once they were filled with tissue paper I laminated the mittens and cut them out. They turned out really pretty and the kids were proud!


We talked about left and right, and practiced finding which was which. I put different tattoos on each kids hands to help them remember which left and right.


We practiced sorting our mittens into left and right piles.


We did many of "The Mitten" printables from Homeschool Creations on my iPad. We did math and counting skills, letter recognition, alphabetical order, and pre-reading skills.


Here is a close up of one of the worksheets on the iPad that Naomi did. Don't know how to save a PDF on your iPad and draw on/edit it? Check out this link! This has been a lifesaver when it comes to our ink costs. Plus, Naomi LOVES using the iPad, so it's been a fun way for her to approach some of these pages in a different way.


Here Naomi was sorting the animals from the story, and learning the names of the ones she wasn't familiar with.


Using the animal cards I had printed off from Homeschool Creations, Naomi put the animals in the mitten as I read the story. She did this activity on her own many times after I finished reading as well. She had fun and it was a great way to practice sequencing.


We talked about real and make-believe, and discussed whether all of those animals could actually fit in a mitten. Then we counted how many of the kids little stuffies we really could fit in a one of my (super cool, Canadian!) mittens.


Nathan LOVED doing this, and we practiced counting as he stuffed the animals in.


We also discussed how some objects could stretch, and how others couldn't, since the mitten in the story had to stretch out a bunch to accommodate all the animals. We made a list of things that stretched and ones that did not. Naomi had a blast running around the house testing to see if she could stretch things. We determined this piece of cardboard did NOT stretch, despite her best efforts!


She found that an elastic was one of the best stretchy items. We measured it before she stretched it, and after. If you look closely you will see the elastic on the ruler. Naomi was impressed with the results!


I printed off realistic pictures of the animals in the story from 1+1+1=1 (remember, go to my Pinterest link at the top of this post for ALL links). It was neat for Naomi to see actual pictures of the animals, and requested to see more online. I was happy to oblige! Here she was labeling all the animals.


We put the other animal cards I had in order, and then practiced using ordinal numbers (first, second, ect.). Naomi got really good at it!


Here Naomi was sorting objects that started with the letter M. I caught her saying mole. :)


Meanwhile, I would tell Nathan the name of an animal, and he would find it. We also practiced saying the animal sounds.


Naomi cut, then sorted left and right mittens, and glued them down.


Naomi found some stick on nails, and I put them on her. This picture was too cute not to share!


Here she sorted words from the story by syllables (1 or 2).


Naomi painted the cover for our lapbook, and was decorating her mitten for the book.


A glimpse of her work board. She is always so proud of what she had done, and drags Jim down to see her new work from the day the second he gets home. I have to say, displaying the work of one child is much easier than doing a whole class like I did back in my teaching days!!


The cover of our mitten lapbook. I got all the printables for our lapbook from Homeschool Share (again, see my Pinterest board).


The inside of our lapbook. On the outside flaps is clues about each animal. When you lift the flap, there is a picture of the animal. Where it says "My Mitten" is a little pocket. In the pocket we put in our animal sequence cards, animal labels, and the animal cards that went with the ordinal numbers. Naomi wanted to decorate the mitten on the pocket with the animal stickers I had.


On the back of our lapbook I put Naomi's story summary, and favorite part of the book. She dictated to me, and I wrote it down. I was AMAZED at how detailed her summary was! She even told me the correct order all 8 animals got in the mitten.

We had a great week and all really enjoyed this mini unit!

Karla